About DynaWeb
From the own words of Radu Gidei, the creator of this package:
“DynaWeb was designed as a package to make other packages, so it provides building blocks enabling you to build Dynamo integrations with just about any web service out there.”
Such a mission statement warms my heart, so here is my contribution to a great package, a series of two articles on how I am using Dynaweb.
What is a web API?
Before we delve into the details of the package, we need to roughly understand what a web API is. I found a great explanation on FreeCodeCamp:
“To summarize, when a company offers an API to their customers, it just means that they’ve built a set of dedicated URLs that return pure data responses — meaning the responses won’t contain the kind of presentational overhead that you would expect in a graphical user interface like a website.”
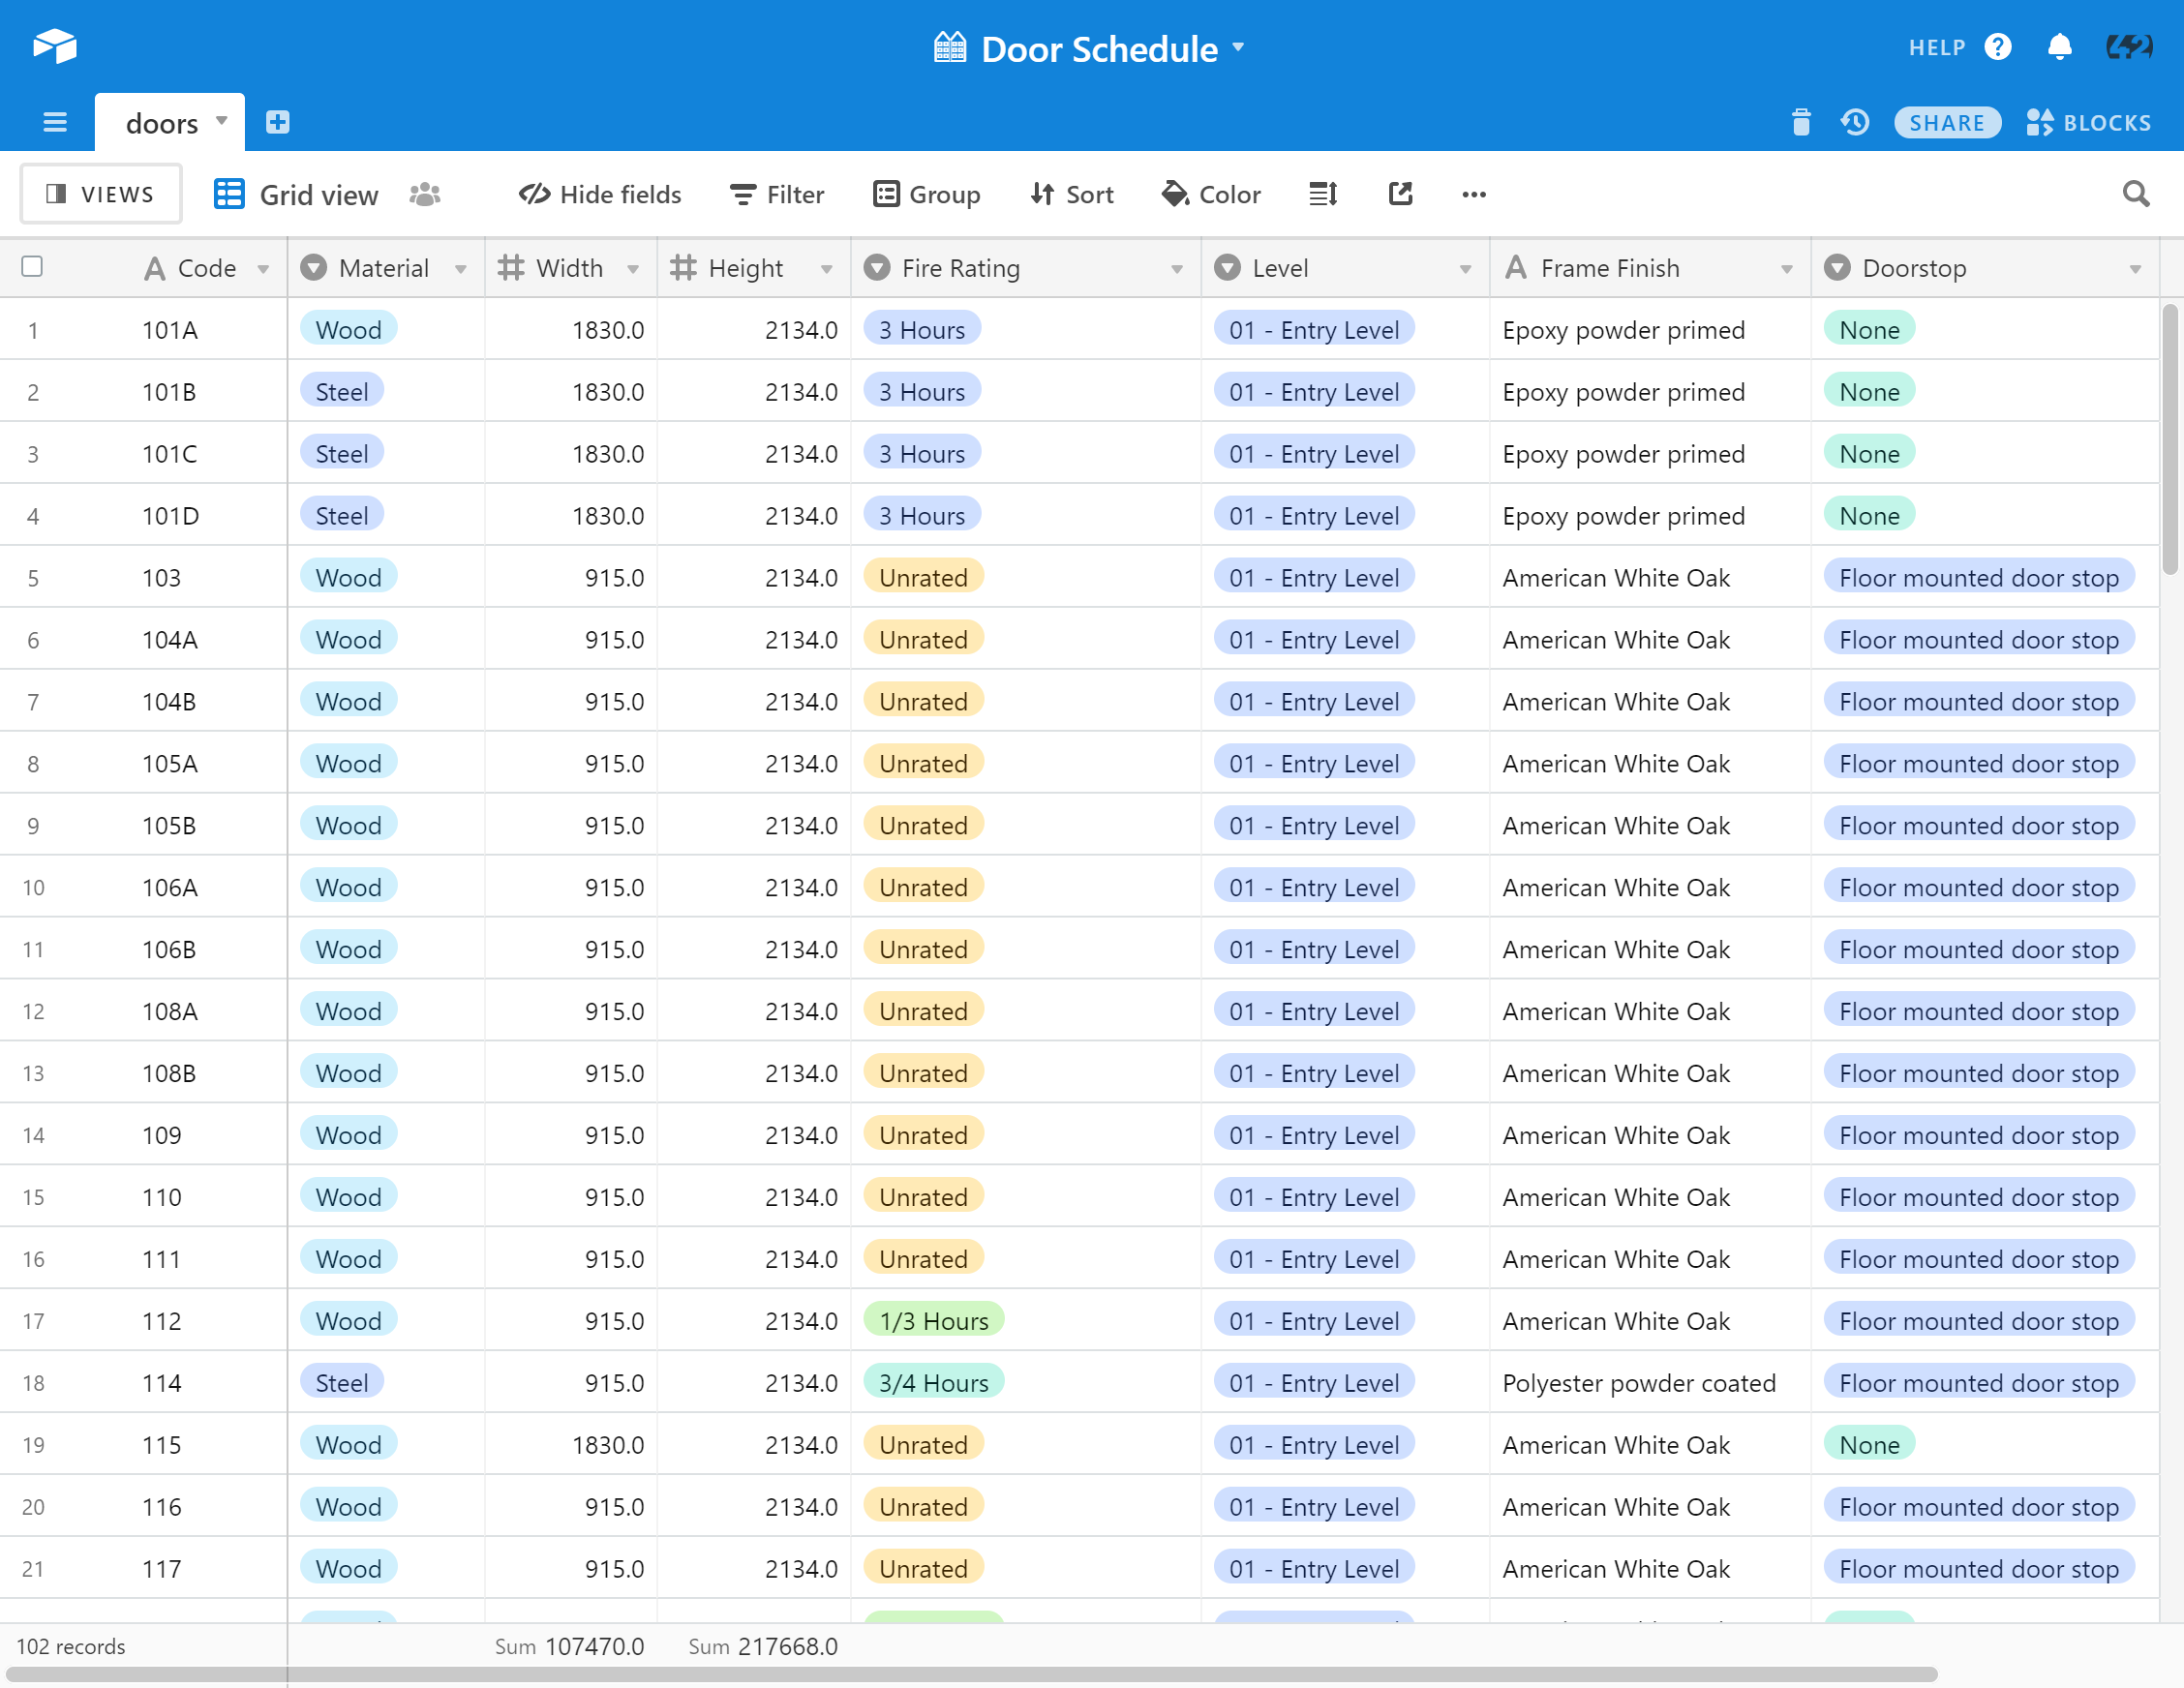
To show the use of a web API with DynaWeb, we will use Airtable. Airtable is a web-based spreadsheet application with extended database functionalities. Thinks Google Sheets on steroids. Along with its web-interface, Airtable offers an API allowing you edit its tables. This API is quite simple to understand and manipulate, we will use it as an example.
I created a small door schedule in Airtable that we will use for the rest of this demonstration:
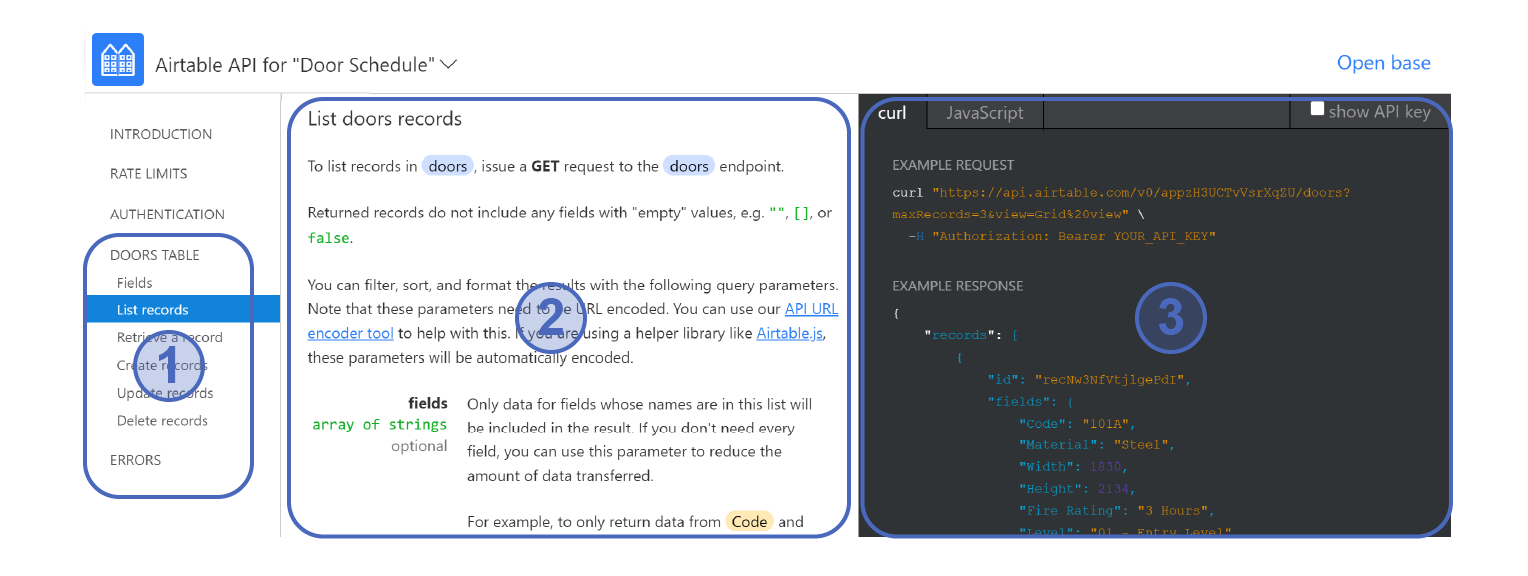
Any API provide a documentation describing how to access it. Airtable is no exception, you can find this documentation here: https://airtable.com/api.
Most documentation offer the same structure, with a list of available requests (1), the description of the currently selected request (2) and the corresponding examples (3):
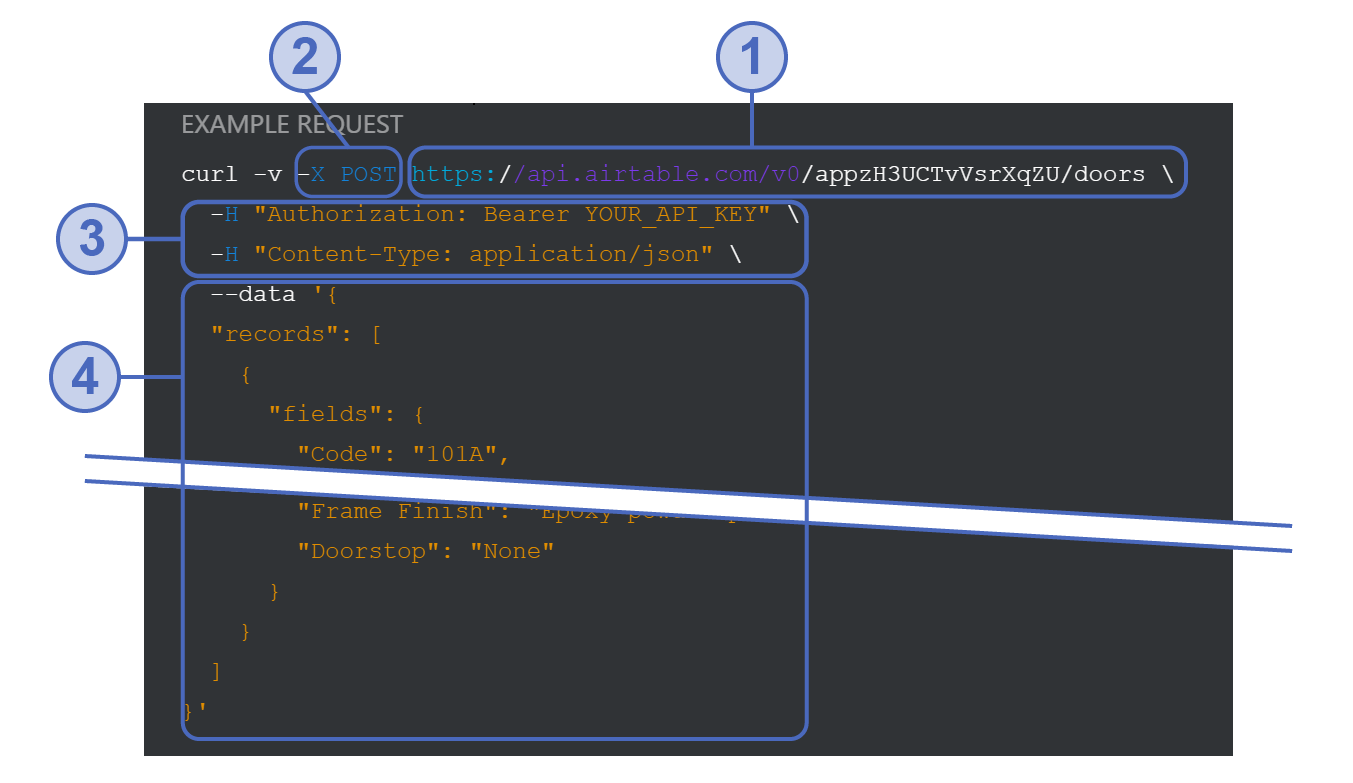
Any request to a web API is made up of four things:
- The endpoint : this is the URL of the request (1)
- The method : this is the type of the request, to be choose from one of these five types : GET, POST, PUT, PATCH, DELETE (2)
- The headers : they provide information to the server such as authentication or content of the request (3)
- The data (or body) : this is the part containing information you want to be sent to the server. This part is generally a JSON-formatted text or a file to be uploaded.(4)
The documentation of the API describe these four parts for each request:
To connect to an Airtable base, you will need an API key and the ID of the base you want to edit. This ID that can be found on the API documentation for this base.
List records
To understand the basics of a REST API, we will start by displaying the content of an Airtable table in Dynamo.
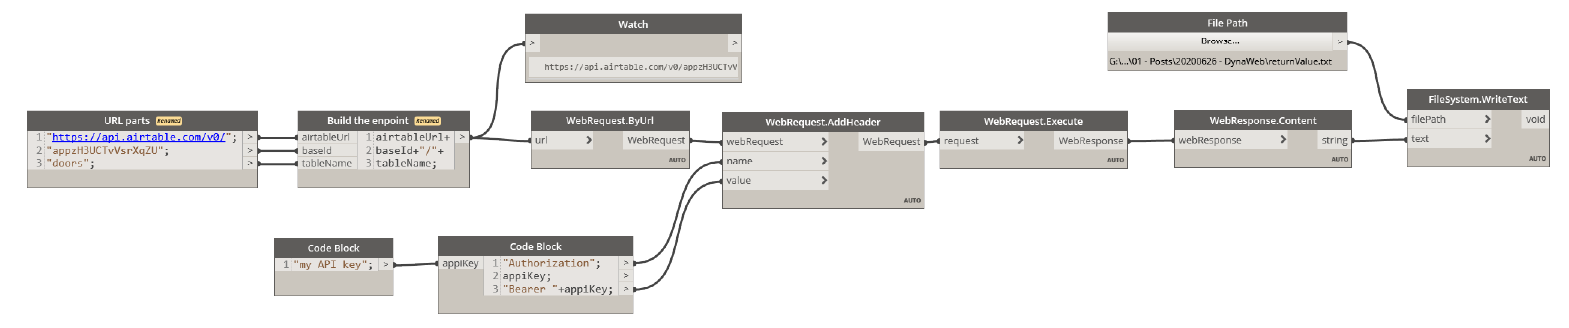
We use a “GET” request, which is the default method of the WebRequest.ByUrl node, with the endpoint provided by the Airtable documentation. We add the WebRequest.Execute node to actually run our request and the WebResponse.Content to read the content of the response coming from Airtable. I also added the FileSystem.WriteText to write the response to a text file:

If we run this, we get the following response:
{
  "error": {
    "type": "AUTHENTICATION_REQUIRED",
    "message": "Authentication required"
  }
}
Obviously, we need some form of authentication to access this table. On the web page, we wouldn’t be able to access this table without first login to Airtable. Since it wouldn’t be very practical to type your login/password each time you want to use an API, they generally come with some form of token-based authentication. This means that you have to pass a special code along with every request. Here, the documentation indicates that “You can authenticate to the API by providing your API key in the HTTP authorization bearer token header.” So we need to add a header to our request, named “Authorization”, containing the value “Bearer” followed by your AI key. The DynaWeb node “WebRequest.AddHeader” allows us to do just that:
This time, the request executes successfully, we get the following text in the content of the Response:
{
 "records": [
   {
     "id": "rec05TzOsAsrWLXD4",
     "fields": {
       "Code": "201",
       "Material": "Steel",
       "Width": 915,
       "Height": 2134,
       "Fire Rating": "3/4 Hours",
       "Level": "02 - Floor",
       "Frame Finish": "Polyester powder coated",
       "Doorstop": "Floor mounted door stop"
     },
     "createdTime": "2020-06-26T14:50:25.000Z"
   },
   {
     "id": "rec0SFG4q4oy3EF17",
     "fields": {
       "Code": "110",
       "Material": "Wood",
       "Width": 915,
       "Height": 2134,
       "Fire Rating": "Unrated",
       "Level": "01 - Entry Level",
       "Frame Finish": "American White Oak",
       "Doorstop": "Floor mounted door stop"
     },
     "createdTime": "2020-06-26T14:50:25.000Z"
   },
...
 ]
}
As you can see, the content of the response is a text in JSON format. To be able to use it in Revit for example, we need to transform it.
JSON and Dictionary
To manipulate this JSON file, we need to convert it into a Dynamo dictionary using the “Helpers.Deserialise” node provided by DynaWeb. This gives us a dictionary with a top-level record aptly named “records” which contains a list of all lines in our Airtable table. Each line is itself represented as a record, i.e. a series of keys and associated values.
We keep on using the “Dictionary.ValueAtKey” node to retry the fields (the columns) and then a list of door numbers (uniquely identifying each door) and a list of Doorstop:

We can then use these two lists to retrieve the doors in Revit and add for example if there is a doorstop in a shared parameter.
The full Dynamo definition is available here.
In the next article, we will see more complex workflows, involving multiples successive requests, item creation and modification and various REST methods.